Wednesday, 11 September 2019

BLUBERRY VODKA SPRITZ SUMMER DRINKS


BLUEBERRY VODKA SPRITZ COCKTAILS MADE IN A FIVE MINUTE SUMMER DRINK.


Back when my mama and I went to Italy, we drank what I can only imagine was gallons of Aperol spritzes. The New York Times just deemed this the worst cocktail ever, which R U D E, but we were totally hooked. Even after my mom left Italy and I departed on my 18-week Europe trip, I would still occasionally order an Aperol spritz for the mems. Aside from one instance where I was misinformed that Campari “is similar to Aperol” and I drank a whole mini-bottle of a Campari spritz and almost died, I think all of those cocktails actually saved me from that humid Italian summer heat.

Now that I’m back in the states, spritz-y cocktails are hard to come by. But I don’t even know why, they’re the perfect summer cocktail! 1. You can make them in bulk for all-day sipping. 2. They’re the easiest ever. 3. I can think of about 500 ways to sneak them onto the beach. And 4. Assuming your spritz-y liquid is sparkling water, you’re almost hydrating yourself whilst drinking. *Science*.

With all of this in mind, I set out to create a pitcher-perfect summer cocktail. And since Mother’s Day is this weekend, I wanted to create a drink inspired by my beautiful, lovely mama. To know my mom is to know that she loves anything with berries or lemon. And inspired by our mutual love of Aperol spritzes and not-too-sweet cocktails, the blueberry lemon vodka spritz was born!


Ok, now let’s talk about why this blueberry lemon vodka spritz is the ideal Mother’s Day cocktail! First of all, you can enjoy these spritzes at brunch, the beach, or at a BBQ. Also, you can easily make it in advance, so all you have to do on Mother’s Day is pull it out of the fridge and serve it! And if you want to make these blueberry lemon vodka spritz cocktails day-of, it only takes five minutes and five ingredients to throw together 🎉

For these spritzes, I partnered with 10 Torr, a local Reno distillery and brewery! Marc and I have been going to their bar since it first opened, it’s one of our favorites. They have an amaaaaazing gin martini. 10 Torr’s vodka is barley-style and they have their own special vacuum-distilling process, so cool! The vodka is so smooth and has a lovely herbaceous flavor that matches so well with berries and citrus. I’m v excited to be working with such a cool, local company!

Happy Mother’s Day to my mom, my grandma, your mom, all the moms! I wonder what Bell is going to get me??


 BLUEBERRY VODKA SPRITZ


Blueberry lemon vodka spritzes can be made a day before, just leave out the sparkling water (or Italian soda) until right before you are ready to serve! We like drier drinks, so we prefer sparkling lemon water to top off the spritz. If you like your drinks on the sweeter side, use lemon Italian soda, and start with half of the simple syrup. Taste, and add more simple syrup as necessary.

Pitcher
 2 cups blueberries (I use frozen)
 2 lemons, thinly sliced and de-seeded, plus more for garnish
 4 oz (1/2 c.) simple syrup
 16 oz (2 c.) 10 Torr vodka
 32 oz (4 c.) sparkling lemon water (or lemon Italian soda)
 Rosemary, for garnish (optional - mint or basil would be good too!)
For a single drink...
 ¼ cup blueberries (I use frozen)
 2 slices of lemon, de-seeded (plus more for garnish)
 ½ oz simple syrup
 2 oz 10 Torr vodka
 4 oz sparkling lemon water (or lemon Italian soda)
 Sprig of rosemary, for garnish (optional - mint or basil would be good too!)
Pitcher
1 -      In a pitcher, muddle the blueberries, lemons, and simple syrup until the lemons release their oils and about half of the blueberries are smashed. (If you don't have a large muddler, a big wooden spoon works great!). Stir in the vodka. Cover and place in the fridge until you are ready to serve (the longer it sits, the more the flavors will infuse).

2 -      Right before serving, stir in the sparkling lemon water (or lemon Italian soda). Pour over ice and garnish with lemons and sprigs of rosemary. Tip: I like to twist the rosemary a bit to release their oils. This will make 8 small drinks or 4 big ones!

For a single drink...
3 -      In a glass, muddle the blueberries, lemons, and simple syrup until the lemons release their oils and about half of the blueberries are smashed. Stir in the vodka. Fill the glass with ice, and top with the sparkling lemon water. Garnish with lemons and a sprig of rosemary. Tip: I like to twist the rosemary a bit to release their oils. Enjoy!

- xo Sara Lynn

Thanks to 10 Torr for sponsoring this post! This recipe is intended for persons over the legal drinking age (21+) and should not be shared with anyone underaged. Also, please drink responsibly!

*Song of the day: Habit by Still Woozy

CHOCOLATE LAYERS CHIP COOKIES


CHOCOLATE LAYERS CHIP COOKIES


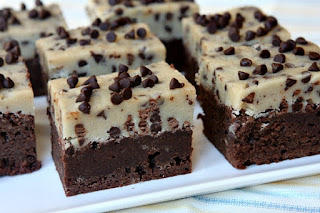
Once upon a time I made a Chocolate Chip Cookie Dough Brownies recipe.  I loved them, I shared them on my blog, and readers either loved them or not. 

There were a few “observations” made about my version of this totally-awesome-brownie-recipe that were sinking into my soul… which caused me to lose sleep at night (not really, but I added that for dramatic effect…)  I LOVE MY FIRST VERSION THE WAY IT IS… but I decided to listen those observations to see if I could create an even better Chocolate Chip Cookie Dough Brownies Recipe and make everyone happy!  Here it is!


OBSERVATION #1:

The cookie dough is “grainy.”  Well, I’ve got news for y’all.  Cookie dough is grainy. That’s just the way it is.  In this version, I melted the butter and then whisked in the sugars to see if I could make it less grainy and more dissolved… it might be a little better, but it’s still grainy.  If you’re a cookie dough lover then you know what I mean and you don’t care.  Cookie dough is just (by nature) grainy!  Someone had suggested trying powdered sugar to avoid the whole grainy-thing.  I wasn’t into that.  Real chocolate chip cookie dough must have both white granulated sugar and brown sugar or it doesn’t taste like chocolate chip cookie dough.  So there.

OBSERVATION #2:

The cookie dough layer isn’t thick enough.  In this version, the brownies are baked in a 9×9- inch pan.  The brownie layer and the cookie dough layer are just about even.  That should satisfy just about everyone, right?

OBSERVATION #3:

The brownie layer isn’t fudgy… or it has no flavor (in other words… it’s not good).  This (new and improved) brownie layer is FUDGY.  Though I have to admit, I don’t think anything is wrong with the original chocolate chip cookie dough brownies recipe.  I like both, but I do like this one better.


OBSERVATION #4:

The cookie dough layer doesn’t stick to the brownie layer.  I don’t have this problem, so let me share exactly how I construct my brownies so it works per-fec-to:  I bake my brownies in a pan lined with parchment paper, then I put them in the refrigerator until they are all cooled down and pretty firm.  While the brownies are baking, I make the cookie dough and then refrigerate it until the cookie dough is chilled and easy to work with (firm-ish).  Then I take the brownies out of the fridge, wet my hands (or spray them with nonstick spray) and pat the cookie dough on top of the brownies into an even layer.  Then I wrap the pan with plastic wrap and refrigerate the brownies until they are firm.  Take the brownies out of the pan and place them on a cutting board.  Because I’m obsessed with neat edges, I use a very sharp, large knife to cut off all of the edges, then I cut the brownies into small, clean pieces.  Clean pieces require that you wipe your knife with a paper towel between cuts.

That’s it!  You’ve learned all of my secrets.  And now you can make my new-and-improved version of this chocolate chip cookie dough brownies recipe.  By all means, let me know what you think of them… and if you have any feedback about these!  Hopefully, they are perfect.  That’s the goal here.  See, I listen to my readers… and keep workin’ it to make you happy and satisfied!  It’s a tough job (you know… re-testing chocolate chip cookie dough brownies over and over again to find the perfect version), but somebody has to do it, right? 🙂


HOW TO MAKE EATING RAW FLOUR SAFE:

I know there are concerns about eating flour that hasn’t been cooked.  Here’s the solution, if you are worried about that. Toast your flour in the oven before using in this recipe.  You’ll just put the flour in a pan and toast it at 350 degrees. F. for 5 minutes. That will kill any potential bacteria in the flour, and you can feel safe to use it in an uncooked cookie dough recipe.


CHOCOLATE CHIP COOKIE DOUGH BROWNIES

COURSE: DESSERT CUISINE: AMERICAN KEYWORD: CHOCOLATE CHIP COOKIE DOUGH BROWNIES, COOKIE DOUGH BROWNIES PREP TIME: 30 MINUTES COOK TIME: 25 MINUTES CHILL TIME:: 2 HOURS TOTAL TIME: 55 MINUTES SERVINGS: 16 SERVINGS CALORIES: 530 KCAL AUTHOR: www.codrtwain.info
A delicious layer of chocolate chip cookie dough sits on top of a fudgy brownie layer.


INGREDIENTS

BROWNIE LAYER:
3/4 cup (1 1/2 sticks) unsalted butter
1 1/2 cups bittersweet chocolate chips
1 cup granulated white sugar
1/2 cup packed light brown sugar
4 large eggs
1 teaspoon vanilla extract
1/2 teaspoon salt
1 cup all purpose flour

COOKIE DOUGH:
3/4 cup (1 1/2 sticks) unsalted butter, at room temperature or almost melted
3/4 cup granulated white sugar
3/4 cup packed light brown sugar
1/4 teaspoon salt
2 tablespoons milk or cream
1 1/2 teaspoons vanilla extract or vanilla bean paste
1 cup all purpose flour (see RECIPE NOTES below)
1 cup miniature chocolate chips
additional miniature chocolate chips, if desired (to sprinkle on top)

INSTRUCTIONS

PREPARE THE BROWNIE LAYER:
Preheat the oven to 350 degrees F. Spray a 9x9-inch pan with nonstick spray, then line with a strip of parchment paper so that it covers the bottom and comes up two sides of the pan. Spray the parchment with nonstick spray too.
In a microwave safe bowl (or in the top of a double boiler or pan set on top of a pan of simmering water), microwave in 30 second bursts to melt butter and chocolate chips together until all is melted and smooth. Whisk in the sugars, then whisk in the eggs, vanilla and salt. Sift flour into the bowl and stir that in too. Scrape the brownie batter into the prepared pan. Bake for 25 to 30 minutes, or until the brownie layer is cooked through (toothpick inserted into the center comes out clean). Place the pan of brownies in the refrigerator to speed up the cooling process (or cool at room temperature and add the cookie dough layer later).

PREPARE THE COOKIE DOUGH LAYER:
In a large bowl, use an electric mixer to combine the butter, sugars and salt until soft and creamy (1 to 2 minutes). Mix in the milk and vanilla. Sprinkle in the flour and mix in until combined. Stir in the 1 cup of chocolate chips. Scoop the cookie dough onto the top of the brownies and spread onto the brownie layer. I find that it's easiest to do this if the brownie layer is chilled and firm. Wet your hands or spray them with nonstick spray and pat the cookie dough on top in a even layer. Sprinkle additional chocolate chips on top to create a nicer, visual appearance. For easy, clean cutting, chill the brownies (wrap the brownies with plastic wrap and chill until firm- 1 to 2 hours or up to 2 days).


CUT THE BROWNIES:

Run a knife along the sides of the brownie pan and then use the parchment paper to lift the brownies from the pan and onto a cutting board. Slice the brownies with a sharp knife, wiping the knife with a paper towel between cuts. If you'd like all of your slices of brownies to look clean-cut without edges, use the knife to cut the sides of the brownies off before cutting pieces. Keep brownies slices covered and chilled until ready to serve.

RECIPE NOTES

If you are worried about eating raw flour, you can cook it in the oven before using it in this recipe.  Sprinkle the flour on a cookie sheet and toast it at 350 degrees. F for 5 minutes.  This will kill any potential bacteria in the flour.


Nutrition Facts
Chocolate Chip Cookie Dough Brownies
Amount Per Serving (1 serving)
Calories 530Calories from Fat 234
% Daily Value*
Fat 26g40%
Saturated Fat 17g106%
Cholesterol 100mg33%
Sodium 163mg7%
Potassium 173mg5%
Carbohydrates 68g23%
Fiber 1g4%
Sugar 51g57%
Protein 5g10%
Vitamin A 635IU13%
Vitamin C 0.2mg0%
Calcium 96mg10%
Iron 1.5mg8%
* Percent Daily Values are based on a 2000 calorie diet.

Tuesday, 10 September 2019

SPARKLING COCKTAILS LEMONADE


LEMONADE SPARKLING COCKTAILS


 A sparkling limoncello cocktail that’s perfect for warm sunny days. It’s sharp, juicy, so refreshing and made with only 3 simple ingredients and garnished with mint leaves and freshly cut lemon slices.
Bring on Summer cocktails
aware Spring has only just arrived but the warmer weather and sunny blue skies have got me excited for Summer and all the yummy cocktails that come with it like my Prosecco strawberry slushie << omg SO good!
Quite frankly, this sparkling limoncello cocktail can be enjoyed any time of the year, I love it, it’s juicy, refreshing and lip smackingly dee-lish!


The three simple ingredients in this cocktail are Limoncello (who knew!?), lemon soda and PROSECCO! Who doesn’t love prosecco?! Noone.

The lemon soda should be tart, sweet and sparkling. I use Sanpellegrino Sparkling Lemon Soda for best results, if you can find it in your supermarket or order it online it’s well worth it. If not get something similar that’s very tart and lemony.

How To Make Sparkling Limoncello Cocktail – Step By Step
Measure 1 shot of limoncello and pour it into the serving glass. Add 2 shots of lemon soda and top up with prosecco.

Add 1-2 ice cubes and garnish with sprigs of mint and slices of freshly cut lemon.
How easy was that? I mean with just 3 simple ingredients you’ll have yourself a delicious, refreshing limoncello cocktail that’s perfect to sip on with nibbles. I’ve listed some delicious little appetizers that would go great with this cocktail below.

Appetizers To Go With Cocktails
Roasted fennel, salami and ricotta crostini
Fried sausage stuffed olives
Pan fried gnocchi (served with dips)
Crostini three ways – perfect party food
Cecina Toscana – Tuscan chickpea flatbread

you’ve tried this sparkling limoncello cocktail or any other recipe on the blog then don’t forget to rate the recipe and let me know how you got on in the comments below, I love hearing from you! You can also FOLLOW ME on FACEBOOK, TWITTER, INSTAGRAM and PINTEREST to see more delicious food and what I’m getting up to.

Ingredients
1 shot (1.3 fl oz/40ml) Limoncello
2 shots (2.7 fl oz/80ml) sparkling lemon soda , Sanpellegrino if possible
3.3 fl oz (100ml) Prosecco
1-2 ice cubes
1 sprig of mint for garnish (optional)
1-2 slices lemon for garnish (optional)

Instructions
Add 1 shot of limoncello to a serving glass. Top with 2 shots of lemon soda and then top up with prosecco.
Add the ice cubes and garnishes, serve.

Nutrition
Calories: 167kcal | Carbohydrates: 19g | Sodium: 11mg | Potassium: 85mg | Sugar: 19g | Iron: 0.4mg

AUTHENTIC LUMPIA INDONESIAN SPRING ROLLS


AUTHENTIC LUMPIA SPRING  ROLLS


This is a recipe I learned while traveling through Indonesian. The ingredients are relatively simple and easy to find in any grocery store. I've cooked this a number of times since getting back and it's always been a hit. They taste great with dipping sauce.

Prep:   1 hr
Cook:   5 mins
Total:   1 hr 25 mins
Additional:       20 mins
Servings:         12
Max Servings: 12
Yield:   24 spring rolls

Ingredients

Original recipe yields 12 servings
2 ounces dried thin rice noodles
¾ cup ground chicken
¼ cup shrimp - washed, peeled, and cut into small pieces
2 larges eggs, beaten
1 carrot, grated
4 wood fungus mushrooms, chopped
2 green onions, chopped
½ teaspoon white sugar
½ teaspoon salt
½ teaspoon ground black pepper
24 rice paper wrappers
2 cups vegetable oil for frying


Directions
Step 1
Soak rice noodles in cold water until soft, about 20 minutes. Drain well; cut into 2-inch long pieces.

Step 2
Combine the noodle pieces, chicken, shrimp, eggs, carrot, wood fungus mushrooms, and green onions in a large bowl. Sprinkle in sugar, salt, and black pepper; stir filling mixture well.

Step 3
Soak 1 rice paper wrapper in a shallow bowl of warm water to soften, about 15 seconds. Remove from water and place on a damp cloth laid out on a flat surface.

Step 4
Place 1 tablespoon of filling mixture into the center of the softened rice paper. Fold the bottom edge into the center, covering the filling. Fold in opposing edges and roll up tightly. Repeat with remaining rice paper wrappers, soaking and filling each one individually.

Step 5
Heat oil in a work or large skillet over medium heat.

Step 6
Fry the spring rolls in batches of 3 or 4 until crisp and golden brown on both sides, about 5 minutes. Drain on paper towels.


Cook's Notes:

Ground pork can be used instead of chicken if desired.
 Shiitake mushrooms can be substituted for the wood fungus mushrooms if desired.

Editor's Note:

We have determined the nutritional value of oil for frying based on a retention value of 10% after cooking. Amount will vary depending on cooking time and temperature, ingredient density, and specific type of oil used.

Nutrition Facts

Per Serving:
132 calories; 5.2 g total fat; 45 mg cholesterol; 225 mg sodium. 14.4 g carbohydrates; 6.5 g protein; Full Nutrition


"It Takes A Village To Raise A Child": The Duchess Marks The Culmination Of Back To Nature

The Duchess of Cambridge began her September schedule today with a previously unannounced visit to RHS Wisley for the fun-filled Back To Nature festival.


It marks Kate's official return to duties following summer break. The engagement was the culmination of Kate's garden project which aimed to highlight the importance of children spending as much time as possible outdoors enjoying nature.


Kensington Palace said: "As part of her longstanding work on Early Years, the Duchess of Cambridge believes that spending time outdoors plays a pivotal role in children’s future health and happiness, building foundations that last through childhood and over a lifetime. Through her Back to Nature gardens, which were displayed earlier this year at the RHS Chelsea Flower Show and Hampton Court Palace Garden Festival, Her Royal Highness has aimed to highlight how spending time outdoors can enrich a child’s early development by providing an environment that encourages active exploration and the opportunity to form and strengthen positive relationships."


The Duchess officially opened a new play garden at Wisley, which was inspired by Back To Nature. Designed by landscape architects Davies White with support from RHS horticultural teams, it includes a number of features from the original garden at RHS Chelsea such as the hollow log and boulders from the waterfall and the hidden burrow and rolling hill from Hampton Court Garden. 


New features include a bouncing forest where visitors can jump on trampolines, a living willow pod and two linked treehouses.

It's a permanent installation which children will enjoy for many years to come.


The Duchess enjoyed a chat with the Queen of Baking and RHS Wisley patron Mary Berry. 


Kate has met Mary on a number of occasions over the years. She was once revealed she is "a big fan of her cookbooks and cakes".


To celebrate the Back To Nature festival will run throughout this week at Wisley. 


It includes circus acts, maypole dancing, a coconut shy and a host of gardening activities. 


Sue Biggs, RHS Director General, said: “We are grateful to The Duchess for the incredible impact that this ‘Back to Nature’ collaboration has had. There is no doubt that this project, through her passion and vision, has highlighted that access to natural environments and green spaces isn’t just a nice to have, it’s vital to have. This is something that the RHS also strongly believes in and will continue to champion through our Greening Great Britain Campaign and charitable work.”


A number of representatives, families and children from charities and organisations Kate has met over the course of her early years work were invited today. 


Hannah Furness reports: "The Duchess was equally impressed by three-year-old Dylan Corbin from Woking, Surrey, who was dressed as an animal. “Are you a tiger?” she asked. “No," he said. "It’s face paint."


Kate was particularly taken by fifteen-month-old Matilda Griffiths. She chatted with mum Sarah about Louis and said "he loves to smell flowers" and spend time in the garden. 


More from The Telegraph:

"Sarah Griffiths, 25, from Southend, Essex, who has been helped by the charity Family Action and brought her 15-month-old daughter Matilda with her, said: “The experience was a bit overwhelming, it’s still a bit of a daze, but really exciting. “She asked me how Family Action have helped me. They’ve helped me lots getting me out socialising.”

A very sweet video of Kate dancing with Matilda.


The group travelled via tractor and trailer before Kate's speech. 


During a very nicely delivered speech, Kate spoke of the importance of laying the foundation blocks from the earliest years, her work in the area and how much she has enjoyed the process of creating the garden. "There is a well-known proverb – that it takes a village to raise a child – everyone here represents an integral part of that very village. By coming together, having fun, learning and experiencing new things, we can all impart life-long benefits on our children."


Kate's full speech from The Mail:

'As many of you know, I was invited by the RHS to co-design a garden for families and children for this year’s Chelsea Flower Show and Hampton Court Palace Garden Festival. It’s been the most amazing experience and I can’t thank the RHS enough for giving me this wonderful opportunity. 
'I am delighted that many of those features that first appeared in those gardens, have found a permanent home here at Wisley in the new children’s play garden. I hope it will enable thousands of children to discover and explore the natural world around them. 
'I am not as green fingered as many of you here, but I was passionate about creating a garden that inspired children and adults alike to get back to nature and reap the positive mental and physical health benefits that it can bring. The gardens were, I suppose, a manifestation of some of the work I have been focusing on around how best we can support our children in the earliest years. 
'The physical benefits of being outdoors and in nature are well documented. More recently, however, I have learnt that these often safe and supportive environments can also bring significant benefits to the cognitive, social and emotional development of our children too. 
'The experiences we gain during our earliest years influence who we become as people. They influence how we interact in school, in work and in society and, ultimately how we bring up our own children. 
'Whether it is planting, exploring, digging, creating, or playing; quality time spent outside provides children with the perfect environment to form those positive relationships with the people in their lives and the world around them. As a parent, I have learnt just how important it is to foster our children’s development, in all areas, not just physical, as soon as they are born. 
'We build the blocks, the foundations, for future success and happiness later in their lives. These relationships, however, stretch far beyond the crucial one that a parent or carer has with its child.  Like in the animal kingdom, whether a pod, a pack, or a pride, the interactions we have with the broader community – be it with our grandparent, teachers or neighbours – play a crucial role in the growth and learning of our young. 
'There is a well-known proverb – that it takes a village to raise a child – everyone here represents an integral part of that very village. By coming together, having fun, learning and experiencing new things, we can all impart life-long benefits on our children. 
'That is why I wanted to invite you here today – many of whom I have met in my pursuit to learn more about the early years - to celebrate the work that you are doing, thank you personally and to continue working with you to inspire even more people to follow your lead. I hope you all have a wonderful day.'

Time for arts and crafts.


The Duchess continued her trend of wearing floral dresses for her garden visits by choosing the Emilia Wickstead Aurora dress (with thanks to Middleton Maven).


The $2,255 piece is described as: "This 'Aurora' shirt dress is made from light and breathable seersucker and decorated with her signature 'Rosewood' florals. Use the buckled belt to define your waist." It's available in limited sizing at Net-A-Porter.


Kate wore her Monsoon Fleur wedges.


A closer look at Kate's new earrings. They were initially identified as an Accessorize pair, however the eagle-eyed What Kate Wore correctly noted several differences. I'll update when/if they are definitively ID'd.


The Back To Nature garden is a lovely addition to Wisley. It was terrific to see so many children from various charities supported by the Duchess having fun and exploring with their loved ones - exactly what the project was all about.