Thursday, 12 September 2019

RASPBERRY COCKTAIL MOJITO RECIPE


RASPBERRY COCKTAIL MOJITO RECIPE


This Raspberry Mojito recipe is an easy refreshing summer drink that combines sweet raspberries, rum, and mint for the perfect sit-back-and-relax drink


Raspberry Mojito Recipe

This raspberry mojito recipe is a refreshing summer cocktail that combines sweet raspberries, rum, and mint, perfect for warmer weather.

The hot days of summer are upon us.  After a long day, there’s really nothing better than sitting back and relaxing with a refreshing raspberry mojito. This easy-to-make drink is the perfect combination of fruity and boozy.


Why this recipe works:

It can easily be made to suit each individual by adjusting the syrup or rum.
The simple raspberry syrup ensures that there is fruity flavor all throughout the drink.


A Little Bit of Trivia

Curious about the history of the mojito? While researching how to develop my recipe, I found out that in 1833, the book El Colera en la Habana by Cuban author Ramon de Palma featured a drink consisting of rum, sugar, lime, and mint; he called the drink “El Draquecito.” Over time, the ‘Draque,’ as it became known (often associated with Sir Francis Drake), was refined into the mojito that we know and love today.

While I do share big batch summer drink recipes, like hard lemonade or white sangria, this raspberry mojito is great because it’s made directly in the glass it’s going to be served in. Perfect for when you want just one (although I doubt you won’t want seconds after trying this easy summer cocktail!).


Here’s how to make the perfect raspberry mojito:


For the Puree:


In a small saucepan, add the raspberries, water, and sugar.
For storage, keep in a bottle or jar.  This recipe makes approximately 2 cups of puree that can be used anytime you want to make a mojito.

For the mojitos:

In a 10-12oz highball glass, crush the three raspberries and mint leaves together with a cocktail muddler or the back of a spoon.


Top Tips For Perfect Mojito:

Always make sure to build this drink in the glass.
Never tear the mint leaves, as it allows the bitterness of the stem to filter through the drink. You also want to avoid breaking them up into small pieces that will block your straw.
Gently stir your mojito as the key to a mojito is the balance – you want to be able to taste each element, but with all of them working together.
Don’t skip the garnish mint sprig and position it right next to the straw so that you get the aroma of the mint with every sip. This accentuates the taste.
Storing the raspberry puree: Store in the refrigerator in an airtight container or jar.  It should last for up to 3 days.
To make the Raspberry purée last longer, add ​a splash of lemon juice to it.  This will act as a preservative and make it last for up to a week (stored in the fridge in an airtight container).

Variations:
Use dark rum instead of white.
Swap out blueberries for the raspberries.


Course: CocktailsCuisine: South AmericanKeyword: cocktail, mojito, raspberry Servings: 1 serving Calories: 279kcal Author: Erren


Ingredients
For the Puree (makes approximately 2 cups):
1 cup of raspberries
1 cup of water
¾ cup of sugar
For the mojito (makes one cocktail):
3 fresh raspberries whole
2 fresh mint leaves
2 ounces light rum
2 ounces Raspberry Puree
3-4 ounces soda water
mint sprigs on stems for garnish
more whole raspberries for garnish
ice
Cups - Metric


Instructions

For the Puree:
In a small saucepan, add the raspberries, water and sugar and. Cook for 5-6 minutes until thickened. Strain with a sieve to remove the seeds and to smooth the mixture.
You can add some seeds to the mixture the if desired.
For storage add to a bottle or jar. This recipe makes approximately 2 cups of puree that can be used any time you want to make a mojito.

For the mojitos:
In a 10-12 ounce highball glass, crush the three raspberries and mint leaves together with a cocktail muddler or the back of a spoon.
Add the ice, and some whole raspberries followed by the rum, raspberry puree and top up the glass with the soda waters. Gently stir.
Garnish with mint sprigs.

Nutrition
Calories: 279kcal | Carbohydrates: 38g | Sodium: 31mg | Sugar: 15g | Vitamin A: 85IU | Vitamin C: 9.3mg

BLUEBERRY CREAM PIE


RED, WHITE, AND BLUEBERRY CREAM PIE


This from-scratch Red, White, and Blueberry Cream Pie is the patriotic pie of of my 4th of July loving dreams.  From the biscoff cookie crust and fresh berries to the homemade white chocolate pudding filling and sweetened whipped cream, this easy dessert recipe is ready for all your summer cookouts and holidays!

Happy Memorial Day Weekend!  Who’s got big plans for the long holiday weekend?  We’ve got dance recitals, weeding, and house remodeling projects on the agenda.  And of course, have a cookout with friends!

We love entertaining and back in March my friend Melanie showed up with this red, white, and blueberry cream pie to our Pi Day pie party.  I immediately started hassling her to share the recipe with me because it was my favorite pie of the night.

Fortunately, Melanie sent me the link to the original recipe on Taste of Home and even gave me her tip about swapping out the graham cracker crust for a biscoff cookie crust, which is basically the most genius move ever. 

Honestly, I don’t even think this pie would be the same with a graham cracker crust, even though my love of graham cracker crusts is strong. 

The other change I made from the original recipe was to make a homemade white chocolate pudding filling rather than picking up a package of pudding mix from the store.


Not that I have anything against pudding mixes.  I have just found that I prefer homemade pudding over the box stuff both in terms of flavor and texture, and I think they are fun to make anyway.  The homemade version is richer with better white chocolate flavor and a more custard-like mouthfeel, in my opinion.

But, since summer and it’s desserts tend to be all about ease and simplicity, I’m going to include the pudding mix variation in the notes just in case and totally encourage you to go for it, whether you choose to make the filling from scratch or not.  Because honestly, I’ve had this pie made both ways and both are delicious. 

And speaking of summer, you will want to make this pie all day long.  For Memorial Day in May, Flag Day in June, and Independence Day in July.

Or don’t even wait for a holiday to celebrate!  This pie is delicious anytime you can get great fresh berries!


INGREDIENTS FOR RED, WHITE, AND BLUEBERRY CREAM PIE

biscoff cookies
butter
sugar
white chocolate (I use bars of white chocolate since white chocolate chips don’t melt very well)
cornstarch
whole milk
salt
egg yolks
vanilla
heavy cream
powdered sugar
red & blue berries (any mix of strawberries, blueberries, raspberries, and 
blackberries)


HOW TO MAKE RED, WHITE, AND BLUEBERRY CREAM PIE

Make a biscoff cookie crust.  Just combine the cookie crumbs, sugar, and melted butter, then press them into a 9-inch pie dish.  Bake at 350 degrees F for 10 minutes.
Make the white chocolate pudding filling by combining sugar, cornstarch and salt in a heavy pan. Whisk in the milk, then bring to a low boil over medium heat, stirring constantly until thickened (about 2 minutes).
Temper the egg yolks by whisking them in a separate bowl, then whisking in about 1 cup of the hot milk mixture.  Add this back to the pan and continue to cook and stir for 2 minutes more, then remove from heat and stir in 4 ounces of white chocolate and butter until both have melted. Add the vanilla and stir.
Assemble the pie.  Melt the remaining 2 ounces of white chocolate and gently spread it over the bottom of the prepared biscoff crust.  Arrange 3/4 cup sliced strawberries on top of the white chocolate, then pour the warm pudding mixture over the strawberries. Cover with a piece of plastic wrap to prevent a skin from forming and refrigerate for 3-4 hours until chilled.
Top with sweetened whipped cream and berries.  Beat heavy cream, powdered sugar and vanilla until light, then spread it on top of the pie filling.  Pile on as many berries on top as you like.

I prefer a mix of blueberries, raspberries, blackberries, and halved strawberries, but you could go with just one blue and one red option if you like.

You could even arrange them into a decorative flag pattern, which I’m sure would be cute and obviously even more patriotic.  But then you don’t get bites of mixed berries in each slice of pie, which is a sacrifice I was not willing to make.

I hope you enjoy this pie every bit as much as we did and that you have a wonderful holiday!

MORE CREAM PIE RECIPES YOU’LL LOVE!
Old-Fashioned Banana Cream Pie
Chocolate Cream Pie
Coconut Cream Pie
Blueberry Custard Pie
No-Bake Sour Cream Lemon Pie
Arkansas Possum Pie (no actual possum involved! just chocolate and cream cheese layers, also sometimes called a lush dessert)
Best Key Lime Pie Recipe
Strawberry Pretzel Icebox Pie
Pumpkin Chiffon Pie
and go to my full pie archives for those of you that love fruit pies but not cream pies!
Be sure to FOLLOW ME on INSTAGRAM, PINTEREST, FACEBOOK, and TWITTER for more great recipe tips and ideas!


INGREDIENTS

BISCOFF COOKIE CRUST
 25 biscoff cookies (about 1 1/2 cups of crumbs)
 1/3 cup granulated sugar
 6 tablespoons butter, melted


FILLING

 4 ounces white chocolate, chopped
 1/2 cup sugar
 1/4 cup cornstarch
 Pinch of salt
 2 1/2 cups whole milk
 4 egg yolks, beaten
 2 tablespoons salted butter
 1 teaspoon vanilla extract


TOPPING

 2 tablespoons white chocolate, chopped
 3/4 cup sliced strawberries
 1 cup heavy cream
 3 tablespoons powdered sugar
 1/2 teaspoon vanilla extract
 Handful each of blueberries, raspberries, blackberries, and halved or quartered strawberries


INSTRUCTIONS
Crust

Finely crush biscoff cookies in a food processor or by placing them in a ziploc bag and rolling with a rolling pin.
In a large bowl, combine biscoff crumbs and sugar, then drizzle with melted butter and stir with a fork until crumbs are evenly moistened.
Press into a 9-inch pie dish using the bottom of a measuring cup or glass, then bake at 350 degrees F for 10 minutes or until the crust is lightly browned just around the edges. Cool completely before filling.
Filling

In a heavy saucepan, combine sugar, cornstarch and salt. Whisk in the milk, then bring to a low boil over medium heat, stirring constantly. Continue to cook and stir for 2 minutes, until thickened.
In a separate bowl, whisk the egg yolks, then add about 1 cup of the hot milk mixture to the egg yolks and whisk well. Add the tempered egg yolk mixture back to the pan and continue to cook and stir for 2 minutes more.
Remove the pudding from the heat. Stir in 4 ounces of chopped white chocolate and butter until both have melted. Add the vanilla and stir.
Assembly

Melt the remaining 2 ounces of white chocolate in short 20 second bursts in the microwave, then drizzle and spread over the bottom of the prepared biscoff crust.

Arrange 3/4 cup sliced strawberries on the white chocolate, then pour the warm pudding mixture over the strawberries. Cover with a piece of plastic wrap to prevent a skin from forming and refrigerate for 3-4 hours until well-chilled.
Beat heavy cream using an electric mixer until it begins to thicken. Add powdered sugar and vanilla and beat until soft, being careful not to overbeat and turn the cream into butter.
Remove plastic wrap from the pie and top with the whipped cream, then pile as many berries on top as desired. I prefer a mix of blueberries, raspberries, blackberries, and halved strawberries, but you could go with just one blue and one red option if you like.


NOTES

Adapted from Taste of Home. The original recipe called for 1 (8-ounce) package cream cheese and 3/4 cup of sugar to be blended together, then mixed with 3/4 cup of low fat milk and 1 (3.3-ounce) package instant white chocolate pudding mix for the filling.

For a no-bake biscoff cookie crust, just chill the crust for 1-2 hours before filling rather than baking it.


NUTRITION INFORMATION: YIELD: 8 SERVING SIZE: 1
Amount Per Serving: CALORIES: 697 TOTAL FAT: 42g SATURATED FAT: 22g TRANS FAT: 1g UNSATURATED FAT: 17g CHOLESTEROL: 181mg SODIUM: 306mg CARBOHYDRATES: 73g FIBER: 1g SUGAR: 51g PROTEIN: 8g

Wednesday, 11 September 2019

CHOCOLATE MILKSHAKE PEANUTS


Decadent Chocolate Milkshake You’d Never Know Is Healthy (Vegan, Gluten-Free, Refined Sugar Free, Easily Made Raw)


I’ve shared a few healthy treats this month (like these and these) but so far they’ve all been practical “tide-you-over-till-lunch” kind of recipes. A nice sweet treat, but not really dessert.

Now that we’re coming to the end of these 31 Days Of Healthy Recipes, I figured, it’s time to celebrate. And what better way than with the most decadent — but secretly healthy — dessert I know?

Enter, the most decadent chocolate milkshake evah!
I’m a big believer in not depriving myself entirely when I’m trying to eat healthier. Completely eliminating the things I crave just isn’t sustainable — at least, not for me — so instead I make allowances and give myself permission.


Dessert doesn’t have to be guilt-ridden, and it doesn’t have to be a “cheat” from your normal way of eating. Dessert can be healthy, too. Or at least, it can be a healthy part of our overall diets. A milkshake a day keeps the giant-bag-of-skittles away, amiright?!


This luscious glass of chocolaty goodness is sweet and indulgent, but made with just a handful of healthy ingredients that will leave you feeling good from the first sip to the last.
You’ve heard me say it before: I don’t like cold foods in cold weather. But I make an exception when it comes to ice cream, and all things ice cream related.

This milkshake is naturally vegan and gluten-free (no ice cream here) but it is thick, creamy, and feels just as indulgent as regular ice cream. It’s also made just a handful of ingredients, and takes seconds to make. Even my husband, who is a chocolate and ice cream snob of the highest order, dubbed this recipe a success.

I believe his words were “can I have another?”
For the past few days I’ve been making a tall glass for each of us to share, and it does double duty satisfying his sweet tooth, and my desire for something a little less gut-bomby or cloying than a regular dessert.

I topped this one off with some chopped hazelnuts and cocoa nibs, and a drizzle of super simple chocolate sauce for even more cocoa flavor. Next up on my list of things to try is making this shake with hazelnut milk in place of the almond milk, and maybe a splash of coffee. Frozen hazelnut mochachino, here I come!
Thank you so much for following along with these 31 Days Of Healthy Recipes. If you’re just stopping in, you can see all the recipes from the past month HERE. (And stay tuned for more healthy — and not so healthy — recipes to come!)

DECADENT CHOCOLATE MILKSHAKE YOU'D NEVER KNOW IS HEALTHY


Prep time
5 mins
Total time
5 mins

Author: Melan Cooking
Recipe type: Vegan, Gluten-Free, Refined Sugar Free, Easily Made Raw
Serves: makes 1 large or 2 small servings


INGREDIENTS

1 large banana, peeled, sliced, and frozen
5-7 ice cubes
1 cup almond milk, or other dairy-free milk (this homemade hazelnut milk would be amazing -- or you could replace some of the milk with cold coffee, if you want a coffee/chocolate shake)
1 TBSP unsweetened cocoa powder, or raw cacao powder
2 TBSP pure maple syrup (grade B if you can find it)
Optional, for serving:
Chocolate fudge sauce (1 TBSP cocoa powder or raw cacao powder + 1 TBSP maple syrup + ½-1 TBSP water, as needed. Mix until smooth.)
A few roasted hazelnuts, chopped, or other nuts (almonds, peanuts, or pistachios would all be good)
Pinch of raw cacoa nibs, or other add-ons like shredded coconut or crushed banana chips -- whatever you like


INSTRUCTIONS

Add everything to your blender, and blend until smooth. Depending on how powerful your blender is, you may need to add a splash more liquid, or use the plunger-stick-thingy to keep the mixture moving. I tested this milkshake in a vitamix and a less powerful blender, and both did a great job -- the vitamix was able to handle more ice and less liquid, but both were churned out thick and delicious shakes.
Pour into a tall glass (or two smaller ones) and serve as is, or with a drizzle of chocolate "fudge" sauce, chopped nuts, cacoa nibs, or other add-ons. Devour.


NOTES

This makes one massive milkshake, or two (probably more reasonably sized) smaller shakes. If you'd like smaller portions, you can certainly try halving the recipe, but depending on your blender it might be difficult to blend the smaller amount.

This recipe contains affiliate links. This means if you follow a link to amazon.com and make a purchase, I get a small percentage at no extra cost to you. Win-win! I am not sponsored by any of the products or brands that I link to, they are only things I personally use or would recommend.

BLUBERRY VODKA SPRITZ SUMMER DRINKS


BLUEBERRY VODKA SPRITZ COCKTAILS MADE IN A FIVE MINUTE SUMMER DRINK.


Back when my mama and I went to Italy, we drank what I can only imagine was gallons of Aperol spritzes. The New York Times just deemed this the worst cocktail ever, which R U D E, but we were totally hooked. Even after my mom left Italy and I departed on my 18-week Europe trip, I would still occasionally order an Aperol spritz for the mems. Aside from one instance where I was misinformed that Campari “is similar to Aperol” and I drank a whole mini-bottle of a Campari spritz and almost died, I think all of those cocktails actually saved me from that humid Italian summer heat.

Now that I’m back in the states, spritz-y cocktails are hard to come by. But I don’t even know why, they’re the perfect summer cocktail! 1. You can make them in bulk for all-day sipping. 2. They’re the easiest ever. 3. I can think of about 500 ways to sneak them onto the beach. And 4. Assuming your spritz-y liquid is sparkling water, you’re almost hydrating yourself whilst drinking. *Science*.

With all of this in mind, I set out to create a pitcher-perfect summer cocktail. And since Mother’s Day is this weekend, I wanted to create a drink inspired by my beautiful, lovely mama. To know my mom is to know that she loves anything with berries or lemon. And inspired by our mutual love of Aperol spritzes and not-too-sweet cocktails, the blueberry lemon vodka spritz was born!


Ok, now let’s talk about why this blueberry lemon vodka spritz is the ideal Mother’s Day cocktail! First of all, you can enjoy these spritzes at brunch, the beach, or at a BBQ. Also, you can easily make it in advance, so all you have to do on Mother’s Day is pull it out of the fridge and serve it! And if you want to make these blueberry lemon vodka spritz cocktails day-of, it only takes five minutes and five ingredients to throw together 🎉

For these spritzes, I partnered with 10 Torr, a local Reno distillery and brewery! Marc and I have been going to their bar since it first opened, it’s one of our favorites. They have an amaaaaazing gin martini. 10 Torr’s vodka is barley-style and they have their own special vacuum-distilling process, so cool! The vodka is so smooth and has a lovely herbaceous flavor that matches so well with berries and citrus. I’m v excited to be working with such a cool, local company!

Happy Mother’s Day to my mom, my grandma, your mom, all the moms! I wonder what Bell is going to get me??


 BLUEBERRY VODKA SPRITZ


Blueberry lemon vodka spritzes can be made a day before, just leave out the sparkling water (or Italian soda) until right before you are ready to serve! We like drier drinks, so we prefer sparkling lemon water to top off the spritz. If you like your drinks on the sweeter side, use lemon Italian soda, and start with half of the simple syrup. Taste, and add more simple syrup as necessary.

Pitcher
 2 cups blueberries (I use frozen)
 2 lemons, thinly sliced and de-seeded, plus more for garnish
 4 oz (1/2 c.) simple syrup
 16 oz (2 c.) 10 Torr vodka
 32 oz (4 c.) sparkling lemon water (or lemon Italian soda)
 Rosemary, for garnish (optional - mint or basil would be good too!)
For a single drink...
 ¼ cup blueberries (I use frozen)
 2 slices of lemon, de-seeded (plus more for garnish)
 ½ oz simple syrup
 2 oz 10 Torr vodka
 4 oz sparkling lemon water (or lemon Italian soda)
 Sprig of rosemary, for garnish (optional - mint or basil would be good too!)
Pitcher
1 -      In a pitcher, muddle the blueberries, lemons, and simple syrup until the lemons release their oils and about half of the blueberries are smashed. (If you don't have a large muddler, a big wooden spoon works great!). Stir in the vodka. Cover and place in the fridge until you are ready to serve (the longer it sits, the more the flavors will infuse).

2 -      Right before serving, stir in the sparkling lemon water (or lemon Italian soda). Pour over ice and garnish with lemons and sprigs of rosemary. Tip: I like to twist the rosemary a bit to release their oils. This will make 8 small drinks or 4 big ones!

For a single drink...
3 -      In a glass, muddle the blueberries, lemons, and simple syrup until the lemons release their oils and about half of the blueberries are smashed. Stir in the vodka. Fill the glass with ice, and top with the sparkling lemon water. Garnish with lemons and a sprig of rosemary. Tip: I like to twist the rosemary a bit to release their oils. Enjoy!

- xo Sara Lynn

Thanks to 10 Torr for sponsoring this post! This recipe is intended for persons over the legal drinking age (21+) and should not be shared with anyone underaged. Also, please drink responsibly!

*Song of the day: Habit by Still Woozy

CHOCOLATE LAYERS CHIP COOKIES


CHOCOLATE LAYERS CHIP COOKIES


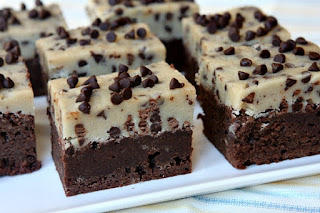
Once upon a time I made a Chocolate Chip Cookie Dough Brownies recipe.  I loved them, I shared them on my blog, and readers either loved them or not. 

There were a few “observations” made about my version of this totally-awesome-brownie-recipe that were sinking into my soul… which caused me to lose sleep at night (not really, but I added that for dramatic effect…)  I LOVE MY FIRST VERSION THE WAY IT IS… but I decided to listen those observations to see if I could create an even better Chocolate Chip Cookie Dough Brownies Recipe and make everyone happy!  Here it is!


OBSERVATION #1:

The cookie dough is “grainy.”  Well, I’ve got news for y’all.  Cookie dough is grainy. That’s just the way it is.  In this version, I melted the butter and then whisked in the sugars to see if I could make it less grainy and more dissolved… it might be a little better, but it’s still grainy.  If you’re a cookie dough lover then you know what I mean and you don’t care.  Cookie dough is just (by nature) grainy!  Someone had suggested trying powdered sugar to avoid the whole grainy-thing.  I wasn’t into that.  Real chocolate chip cookie dough must have both white granulated sugar and brown sugar or it doesn’t taste like chocolate chip cookie dough.  So there.

OBSERVATION #2:

The cookie dough layer isn’t thick enough.  In this version, the brownies are baked in a 9×9- inch pan.  The brownie layer and the cookie dough layer are just about even.  That should satisfy just about everyone, right?

OBSERVATION #3:

The brownie layer isn’t fudgy… or it has no flavor (in other words… it’s not good).  This (new and improved) brownie layer is FUDGY.  Though I have to admit, I don’t think anything is wrong with the original chocolate chip cookie dough brownies recipe.  I like both, but I do like this one better.


OBSERVATION #4:

The cookie dough layer doesn’t stick to the brownie layer.  I don’t have this problem, so let me share exactly how I construct my brownies so it works per-fec-to:  I bake my brownies in a pan lined with parchment paper, then I put them in the refrigerator until they are all cooled down and pretty firm.  While the brownies are baking, I make the cookie dough and then refrigerate it until the cookie dough is chilled and easy to work with (firm-ish).  Then I take the brownies out of the fridge, wet my hands (or spray them with nonstick spray) and pat the cookie dough on top of the brownies into an even layer.  Then I wrap the pan with plastic wrap and refrigerate the brownies until they are firm.  Take the brownies out of the pan and place them on a cutting board.  Because I’m obsessed with neat edges, I use a very sharp, large knife to cut off all of the edges, then I cut the brownies into small, clean pieces.  Clean pieces require that you wipe your knife with a paper towel between cuts.

That’s it!  You’ve learned all of my secrets.  And now you can make my new-and-improved version of this chocolate chip cookie dough brownies recipe.  By all means, let me know what you think of them… and if you have any feedback about these!  Hopefully, they are perfect.  That’s the goal here.  See, I listen to my readers… and keep workin’ it to make you happy and satisfied!  It’s a tough job (you know… re-testing chocolate chip cookie dough brownies over and over again to find the perfect version), but somebody has to do it, right? 🙂


HOW TO MAKE EATING RAW FLOUR SAFE:

I know there are concerns about eating flour that hasn’t been cooked.  Here’s the solution, if you are worried about that. Toast your flour in the oven before using in this recipe.  You’ll just put the flour in a pan and toast it at 350 degrees. F. for 5 minutes. That will kill any potential bacteria in the flour, and you can feel safe to use it in an uncooked cookie dough recipe.


CHOCOLATE CHIP COOKIE DOUGH BROWNIES

COURSE: DESSERT CUISINE: AMERICAN KEYWORD: CHOCOLATE CHIP COOKIE DOUGH BROWNIES, COOKIE DOUGH BROWNIES PREP TIME: 30 MINUTES COOK TIME: 25 MINUTES CHILL TIME:: 2 HOURS TOTAL TIME: 55 MINUTES SERVINGS: 16 SERVINGS CALORIES: 530 KCAL AUTHOR: www.codrtwain.info
A delicious layer of chocolate chip cookie dough sits on top of a fudgy brownie layer.


INGREDIENTS

BROWNIE LAYER:
3/4 cup (1 1/2 sticks) unsalted butter
1 1/2 cups bittersweet chocolate chips
1 cup granulated white sugar
1/2 cup packed light brown sugar
4 large eggs
1 teaspoon vanilla extract
1/2 teaspoon salt
1 cup all purpose flour

COOKIE DOUGH:
3/4 cup (1 1/2 sticks) unsalted butter, at room temperature or almost melted
3/4 cup granulated white sugar
3/4 cup packed light brown sugar
1/4 teaspoon salt
2 tablespoons milk or cream
1 1/2 teaspoons vanilla extract or vanilla bean paste
1 cup all purpose flour (see RECIPE NOTES below)
1 cup miniature chocolate chips
additional miniature chocolate chips, if desired (to sprinkle on top)

INSTRUCTIONS

PREPARE THE BROWNIE LAYER:
Preheat the oven to 350 degrees F. Spray a 9x9-inch pan with nonstick spray, then line with a strip of parchment paper so that it covers the bottom and comes up two sides of the pan. Spray the parchment with nonstick spray too.
In a microwave safe bowl (or in the top of a double boiler or pan set on top of a pan of simmering water), microwave in 30 second bursts to melt butter and chocolate chips together until all is melted and smooth. Whisk in the sugars, then whisk in the eggs, vanilla and salt. Sift flour into the bowl and stir that in too. Scrape the brownie batter into the prepared pan. Bake for 25 to 30 minutes, or until the brownie layer is cooked through (toothpick inserted into the center comes out clean). Place the pan of brownies in the refrigerator to speed up the cooling process (or cool at room temperature and add the cookie dough layer later).

PREPARE THE COOKIE DOUGH LAYER:
In a large bowl, use an electric mixer to combine the butter, sugars and salt until soft and creamy (1 to 2 minutes). Mix in the milk and vanilla. Sprinkle in the flour and mix in until combined. Stir in the 1 cup of chocolate chips. Scoop the cookie dough onto the top of the brownies and spread onto the brownie layer. I find that it's easiest to do this if the brownie layer is chilled and firm. Wet your hands or spray them with nonstick spray and pat the cookie dough on top in a even layer. Sprinkle additional chocolate chips on top to create a nicer, visual appearance. For easy, clean cutting, chill the brownies (wrap the brownies with plastic wrap and chill until firm- 1 to 2 hours or up to 2 days).


CUT THE BROWNIES:

Run a knife along the sides of the brownie pan and then use the parchment paper to lift the brownies from the pan and onto a cutting board. Slice the brownies with a sharp knife, wiping the knife with a paper towel between cuts. If you'd like all of your slices of brownies to look clean-cut without edges, use the knife to cut the sides of the brownies off before cutting pieces. Keep brownies slices covered and chilled until ready to serve.

RECIPE NOTES

If you are worried about eating raw flour, you can cook it in the oven before using it in this recipe.  Sprinkle the flour on a cookie sheet and toast it at 350 degrees. F for 5 minutes.  This will kill any potential bacteria in the flour.


Nutrition Facts
Chocolate Chip Cookie Dough Brownies
Amount Per Serving (1 serving)
Calories 530Calories from Fat 234
% Daily Value*
Fat 26g40%
Saturated Fat 17g106%
Cholesterol 100mg33%
Sodium 163mg7%
Potassium 173mg5%
Carbohydrates 68g23%
Fiber 1g4%
Sugar 51g57%
Protein 5g10%
Vitamin A 635IU13%
Vitamin C 0.2mg0%
Calcium 96mg10%
Iron 1.5mg8%
* Percent Daily Values are based on a 2000 calorie diet.